Combining a mesh of a few vertices and multitude of modifiers (mirror, array, deform, and particle), I was able to create a neat looking DNA strand out of 1's and 0's - a Binary Double Helix or Binary Binary Helix? This tutorial assumes a lot about your knowledge of Blender. You should probably be familiar with modifiers, particle system, and nodes.
There are two ways of achieving this that I know of: 1) Using a Screw Modifier 2) Using a Deform Modifier. There is already a decent
video about using a Deform Modifier to create a helix so I won't post another one. Although, I wouldn't use the shapes that the video suggests but instead use a mirror modifier to create mirrored sides along with an array to create each rung. I stacked them like this:
- mirror - for duplicating the other side
- array - creates the individual rungs
- deform - twists the strand around the origin
- array - creates multiple sections...be really cool to set this up in 3's like DNA should be ;)
- sub surf (if you need it, like if you're using cylinders instead of particles)
Should look something like this photo (the empty box is used for the deform modifier's origin):
After creating the helix, make some 1's and 0's on another layer. I used a box and a circle mesh to start with because the text meshes tend to have a lot of vertices. Then add them to a group to be used with the particle system. In the particle system (also shown in the image below) just get the particles working on a single section; because, currently (Blender 2.66), the modifiers won't work with the particle system until you apply them later.
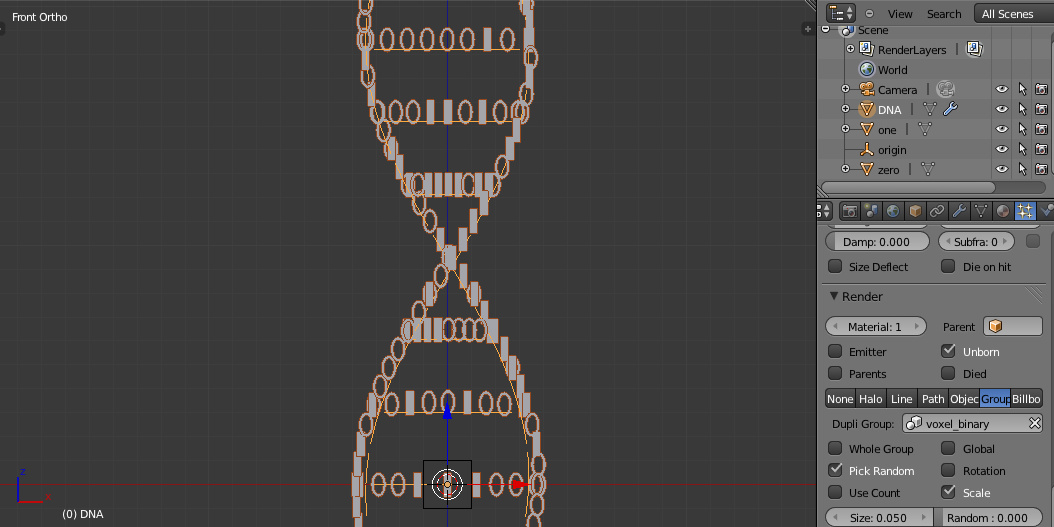
- In the Emission section, turn on Vertex and turn off Random.
- In Render section, turn on Unborn.
- Turn off the emitter so the vertices or faces don't show up. Unless you want this.
- Select the new group of 1's and 0's you made.
- Turn on the Pick Random.
You might have to play with the rotations of the 1's and 0's a bit (pun intended). Also, use the subdivide to create more vertices and space out the particles how you want. I made the mistake here of only using 7 bits inside as the rung. You probably want some multiple of 2 like 8 bits to add that extra coolness or to write something in ASCII or other encoding.
For the cool glow effect I used these two videos (using both blur and glare filters):
- Blender 2.64 Tutorial: Advanced Particle Trail in Cycles
- Blender Tutorial: Create a Spaceship Corridor in Blender - Part 2 of 2


